



Apple’s newest devices feature the Retina Display, a screen that packs double as many pixels into the same space as older devices. For designers this immediately brings up the question, “What can I do to make my content look outstanding on these new iPads and iPhones?”. First there are a few tough questions to consider, but then this guide will help you get started making your websites and web apps look amazingly sharp with Retina images!

Things to Consider When Adding Retina Images
The main issue with adding retina images is that the images are double as large and will take up extra bandwidth (this won’t be an issue for actual iOS apps, but this guide is covering web sites & web apps only). If your site is mostly used on-the-go over a 3G network it may not be wise to make all your graphics high-definition, but maybe choose only a select few important images. If you’re creating something that will be used more often on a WI-FI connection or have an application that is deserving of the extra wait for hi-res graphics these steps below will help you target only hi-res capable devices.
Simple Retina Images
The basic concept of a Retina image is that your taking a larger image, with double the amount of pixels that your image will be displayed at (e.g 200 x 200 pixels), and setting the image to fill half of that space (100 x 100 pixels). This can be done manually by setting the height and width in HTML to half the size of your image file.
<img src="my200x200image.jpg" width="100" height="100">
If you’d like to do something more advanced keep reading below for how you can apply this technique using scripting.
Creating Retina Icons for Your Website
When users add your website or web app to their homescreen it will be represented by an icon. These sizes for regular and Retina icons (from Apple) are as follows:

| iPhone | 57 x 57 |
|---|---|
| Retina iPhone | 114 x 114 |
| iPad | 72 x 72 |
| Retina iPad | 144 x 144 |
For each of these images you create you can link them in the head of your document like this (if you want the device to add the round corners remove -precomposed):
<link href="touch-icon-iphone.png" rel="apple-touch-icon-precomposed" />
<link href="touch-icon-ipad.png" rel="apple-touch-icon-precomposed" sizes="72x72" />
<link href="touch-icon-iphone4.png" rel="apple-touch-icon-precomposed" sizes="114x114" />
<link href="touch-icon-ipad3.png" rel="apple-touch-icon-precomposed" sizes="144x144" />
If the correct size isn’t specified the device will use the smallest icon that is larger than the recommended size (i.e. if you left out the 114px the iPhone 4 would use the 144px icon).
Retina Background Images
Background images that are specified in your CSS can be swapped out using media queries. You’ll first want to generate two versions of each image. For example ‘bgPattern.png’ at 100px x 100px and ‘bgPattern@2x.png’ at 200px x 200px. It will be useful to have a standard naming convention such as adding @2x for these retina images. To add the new @2x image to your site simply add in the media query below (You can add any additional styles that have background images within the braces of the same media query):
.repeatingPattern {
     background: url(../images/bgPattern.png) repeat;
     background-size: 100px 100px;
}

@media only screen and (-webkit-min-device-pixel-ratio: 2) {
     .repeatingPattern {
          background: url(../images/bgPattern@2x.png) repeat;
     }
}
JavaScript for Retina Image Replacement
For your retina images that aren’t backgrounds the best option seems to be either creating graphics with CSS, using SVG, or replacing your images with JavaScript. Just like the background images, you’ll want to create a normal image and one ‘@2x’ image. Then with JavaScript you can detect if the pixel ratio of the browser is 2x, just like you did with the media query:
if (window.devicePixelRatio == 2) {

//Replace your img src with the new retina image

}
If you’re using jQuery you could quickly replace all your images like this very basic example below. It’s a good idea to add a class to identify the images with hi-res versions so you don’t replace any others by mistake. I’ve added a class=”hires” for this example. Also make sure you have the standard (non-retina) image height and width set in the HTML:
<img class="hires" alt="" src="search.png" width="100" height="100" />
<script type="text/javascript">
$(function () {

	if (window.devicePixelRatio == 2) {

          var images = $("img.hires");

          // loop through the images and make them hi-res
          for(var i = 0; i < images.length; i++) {

            // create new image name
            var imageType = images[i].src.substr(-4);
            var imageName = images[i].src.substr(0, images[i].src.length - 4);
            imageName += "@2x" + imageType;

            //rename image
            images[i].src = imageName;
          }
     }

});
</script>
Server-Side Retina Images
If you’d like to implement a server-side retina image solution, I recommend checking out Jeremy Worboys’ Retina Images (which he also posted in the comments below). His solution uses PHP code to determine which image should be served. The benefit of this solution is that it doesn’t have to replace the small image with the retina one so you’re using less bandwidth, especially if you have lots of images that you’re replacing.
Website Optimization for Retina Displays
If you’re looking for additional information on creating Retina images, I’ve recently had a short book published called Website Optimization for Retina Displays that covers a range of related topics. It contains some of what is above, but also includes samples for many different situations for adding Retina images. It explains the basics of creating Retina images, backgrounds, sprites, and borders. Then it talks about using media queries, creating graphics with CSS, embedding fonts, creating app icons, and more tips for creating Retina websites.
一、添加引用 using System.Web.SessionState;
二、实现接口 public class Handler : IHttpHandler, IRequiresSessionState { }
三、使用方法 HttpContext.Current.Session["xxx"] = value;

调用返回 ArrayList 类型的 Web Service 的方法,可以使用如下代码获取数据集:
ArrayList al = new ArrayList(mallbll.MallsSearch());
今天算是长见识了,项目发布到服务器上面了,但是客户在使用的时候发现,只要进入新增页面和修改页面。再进行操作就会自动跳转到登陆页面(我设置了session保存用户登陆信息),而别的页面就不会出现这个问题。从下午开始找个问题,开始以为不知道只有这两个页面有问题,以为全部都是这样的问题,是IIS的设置问题。我将session的超时时间设置了3个小时,发现还是会跳转到登陆页面。也在web.config文件里面设置了超时时间。但是效果还是一样的。自己测试了一下午,发现只有新增页面和修改页面会出现这样的问题(本机测试没问题/测试服务器上测试也没问题)。经过几次实验,发现确实只有这两个页面会有问题,那就可以断定:不是IIS设置问题,也不是web.config的问题。本地调试也不出现这样的情况,没办法,只能等客户下班之后,没人用了才到正式服务器上去慢慢的调试,最后想个笨办法,将其中一个页面的.cs文件里面的代码一句一句的删掉,可没想到我都将cs文件里面的代码全部删除了,还是会出现这样的情况,我当时就纳闷了。不是事件的问题,难道是HTML页面出了问题???
既然耐着性子删了cs文件的代码。我就继续删!将aspx页面里面的HTML代码和JS代码也一个一个的删掉,一个一个控件删掉测试,从下午上班一直测试到晚上11点,眼睛都看花了,终于,在我将aspx页面的其中几个控件删除之后发现问题了!页面不跳转了!这下来劲了,肯定是这几个控件的原因,于是乎,我就一个一个控件还原回去,不跳转!继续还原!!当我还原到<img src="" >这个控件的时候测试,发现问题了!只要我一加上<img src="">这个标签!页面就跳转到登陆页面了。问题肯定出在这了!但是我又想不通了,为什么就这个HTML标签一加上就会出问题,这应该不关session什么事啊,怎么会加上这个标签页面就直接跳转了呢?
在网上找了下资料,没找到相关的资料,后来试着将img 标签的src=""加上图片,src="imges/001.jpg" 再测试,发现页面不跳转了!!原来问题出现在这里!
src=""为空的情况下,可能导致session丢失!跟经理说了下这个情况,他也很惊奇还没见过一个HTML标签会导致session丢失的情况,因为在本地和测试服务器上测试的时候都没这样的情况,后来猜测了下,可能是IIS的问题,可能是IIS解析的时候解析到src=""这个地方解析不了,导致程序出问题。但这只是个人猜测,正式服务器上我也没权力当时去打补丁,一个大公司的正式服务器,我要打补丁去了,那他们别的网站和系统不全当机了?所以就只要想了个办法,将src=""里面加上图片,幸好这个img标签是隐藏起来的,加了也不影响界面。呵呵。。。
最让人郁闷的是我测试的时候是用Symantec pcAnywhere这个软件远程连接到的正式服务器上。反应慢得可以,简直比电脑没装显卡驱动还慢...唉,不过累也累了,以后碰到这样的情况就有经验了。
我不知道网上有没有人碰到过跟我一样的情况;如果碰到了,希望能给你带来点灵感。哇哈哈。。。
下载最新的免费CodeHighlighter组件 http://www.CodeHighlighter.com
1。确保web.config中的languages节点的.xml文件路径正确。
2。可以在insertCode.aspx更改编辑的默认设置,如checkbox的check等。(或在项目中搜索相关代码)
DotNetTextBox 已集成CodeHighlighter,我的修改如下:
将 Windows\Temp 目录的权限 Network Service 帐户赋予了完全控制的权限
出错快照:
“/”应用程序中的服务器错误。
编译错误
说明: 在编译向该请求提供服务所需资源的过程中出现错误。请检查下列特定错误详细信息并适当地修改源代码。
编译器错误消息: CS0016: Could not write to output file 'c:\Windows\Microsoft.NET\Framework\v2.0.50727\Temporary ASP.NET Files\root\138641eb\e8d016c8\App_Web_default.aspx.bb4e7940.re_hlwux.dll' -- '拒绝访问。 '
在Vista IIS 7 中用 vs2005 调试 Web 项目核心是要解决以下几个问题:
1、Vista 自身在安全性方面的User Account Control (UAC)
2、安装必须的IIS7 组件。
3、Vista 自带的IIS7 跟 IIS 6 在底层都发生了变化,我们如何让IIS7以兼容IIS6 的方式运行。因为VS2005并不支持IIS7。
下面通过截图方式来说明如何配置上述几点,以保证VS2005可以调试 Vista 操作系统中基于IIS的Web 项目。
一、安装必须的IIS7 组件
IIS7 被分成了很多个组件,默认是不安装的,你需要安装这些组件。
下图对应的功能,可以通过以下步骤打开:
开始 --> 控制面板 --> 程序 --> 打开或关闭 Windows 功能

1、VS2005 并不能识别 IIS7 ,要让它识别IIS7, 就需要安装IIS7 的一个插件:IIS6 管理兼容性;
2、IIS 默认安全性:VS2005 中,如果要调试站点的话,必须有“集成 Windows 身份验证”
其他两个,在一些情况下也能会用到:
摘要式身份验证 是使用 Windows 域控制器对请求访问 Web 服务器上内容的用户进行身份验证。
基本身份验证 是要求用户提供有效的用户名和密码才能访问内容。
3、要调试 ASP.net 当然要安装IIS支持 ASP.net 的组件了。
二、配置IIS7
1、IIS7 在安装了上述组件后,一些功能并没有启用,你需要把它启用起来:
下述配置功能你可以在
控制面板 --> 管理工具 -->Internet 信息服务(IIS)管理器 程序中找到
打开 Internet 信息服务(IIS)管理器 后,在中间部分的下部,可以看到 身份验证 配置项,双击就是如下界面:

刚才我们增加的几个身份验证,需要在你要调试的站点上启用。
注意:是你要调试的站点,而不是你要调试的应用程序目录!
2、IIS7 应用程序池的设置
IIS 的应用程序池根据托管管道模式分了两种类型:集成和经典
集成 .NET 模式下,应用程序不应在 <system.web>/<httpModules> 配置节中指定 ASP.NET 模块组件,而应使用 <system.webServer>/<modules> 配置节来加载 ASP.NET 模块组件。
经典 .NET 模式 则是我们以前习惯的IIS 6 的方式,没有上述限制。
毕竟现在 Longhorn Server 离我们还远,我们当然要兼容Window 2003 的IIS6 的模式,所以我们需要修改站点的应用程序池设置,如下图:

我上面的截图是使用了现有的经典模式的应用程序池,你也可以自己先建立一个经典模式的应用程序池,然后再用上图方式配置对应站点使用的这个经典模式的应用程序池。
三、 VS2005 的启动。
由于 Vista 的 User Account Control (UAC) ,要避免调试中出现没有权限问题,我们应该以管理员身份来运行 Vista.如下图:

".*"="application/octet-stream"
".001"="application/x-001"
".301"="application/x-301"
".323"="text/h323"
".906"="application/x-906"
".907"="drawing/907"
".a11"="application/x-a11"
".acp"="audio/x-mei-aac"
".ai"="application/postscript"
".aif"="audio/aiff"
".aifc"="audio/aiff"
".aiff"="audio/aiff"
".anv"="application/x-anv"
".asa"="text/asa"
".asf"="video/x-ms-asf"
".asp"="text/asp"
".asx"="video/x-ms-asf"
".au"="audio/basic"
".avi"="video/avi"
".awf"="application/vnd.adobe.workflow"
".biz"="text/xml"
".bmp"="application/x-bmp"
".bot"="application/x-bot"
".c4t"="application/x-c4t"
".c90"="application/x-c90"
".cal"="application/x-cals"
".cat"="application/vnd.ms-pki.seccat"
".cdf"="application/x-netcdf"
".cdr"="application/x-cdr"
".cel"="application/x-cel"
".cer"="application/x-x509-ca-cert"
".cg4"="application/x-g4"
".cgm"="application/x-cgm"
".cit"="application/x-cit"
".class"="java/*"
".cml"="text/xml"
".cmp"="application/x-cmp"
".cmx"="application/x-cmx"
".cot"="application/x-cot"
".crl"="application/pkix-crl"
".crt"="application/x-x509-ca-cert"
".csi"="application/x-csi"
".css"="text/css"
".cut"="application/x-cut"
".dbf"="application/x-dbf"
".dbm"="application/x-dbm"
".dbx"="application/x-dbx"
".dcd"="text/xml"
".dcx"="application/x-dcx"
".der"="application/x-x509-ca-cert"
".dgn"="application/x-dgn"
".dib"="application/x-dib"
".dll"="application/x-msdownload"
".doc"="application/msword"
".dot"="application/msword"
".drw"="application/x-drw"
".dtd"="text/xml"
".dwf"="Model/vnd.dwf"
".dwf"="application/x-dwf"
".dwg"="application/x-dwg"
".dxb"="application/x-dxb"
".dxf"="application/x-dxf"
".edn"="application/vnd.adobe.edn"
".emf"="application/x-emf"
".eml"="message/rfc822"
".ent"="text/xml"
".epi"="application/x-epi"
".eps"="application/x-ps"
".eps"="application/postscript"
".etd"="application/x-ebx"
".exe"="application/x-msdownload"
".fax"="image/fax"
".fdf"="application/vnd.fdf"
".fif"="application/fractals"
".fo"="text/xml"
".frm"="application/x-frm"
".g4"="application/x-g4"
".gbr"="application/x-gbr"
".gcd"="application/x-gcd"
".gif"="image/gif"
".gl2"="application/x-gl2"
".gp4"="application/x-gp4"
".hgl"="application/x-hgl"
".hmr"="application/x-hmr"
".hpg"="application/x-hpgl"
".hpl"="application/x-hpl"
".hqx"="application/mac-binhex40"
".hrf"="application/x-hrf"
".hta"="application/hta"
".htc"="text/x-component"
".htm"="text/html"
".html"="text/html"
".htt"="text/webviewhtml"
".htx"="text/html"
".icb"="application/x-icb"
".ico"="image/x-icon"
".ico"="application/x-ico"
".iff"="application/x-iff"
".ig4"="application/x-g4"
".igs"="application/x-igs"
".iii"="application/x-iphone"
".img"="application/x-img"
".ins"="application/x-internet-signup"
".isp"="application/x-internet-signup"
".IVF"="video/x-ivf"
".java"="java/*"
".jfif"="image/jpeg"
".jpe"="image/jpeg"
".jpe"="application/x-jpe"
".jpeg"="image/jpeg"
".jpg"="image/jpeg"
".jpg"="application/x-jpg"
".js"="application/x-javascript"
".jsp"="text/html"
".la1"="audio/x-liquid-file"
".lar"="application/x-laplayer-reg"
".latex"="application/x-latex"
".lavs"="audio/x-liquid-secure"
".lbm"="application/x-lbm"
".lmsff"="audio/x-la-lms"
".ls"="application/x-javascript"
".ltr"="application/x-ltr"
".m1v"="video/x-mpeg"
".m2v"="video/x-mpeg"
".m3u"="audio/mpegurl"
".m4e"="video/mpeg4"
".mac"="application/x-mac"
".man"="application/x-troff-man"
".math"="text/xml"
".mdb"="application/msaccess"
".mdb"="application/x-mdb"
".mfp"="application/x-shockwave-flash"
".mht"="message/rfc822"
".mhtml"="message/rfc822"
".mi"="application/x-mi"
".mid"="audio/mid"
".midi"="audio/mid"
".mil"="application/x-mil"
".mml"="text/xml"
".mnd"="audio/x-musicnet-download"
".mns"="audio/x-musicnet-stream"
".mocha"="application/x-javascript"
".movie"="video/x-sgi-movie"
".mp1"="audio/mp1"
".mp2"="audio/mp2"
".mp2v"="video/mpeg"
".mp3"="audio/mp3"
".mp4"="video/mpeg4"
".mpa"="video/x-mpg"
".mpd"="application/vnd.ms-project"
".mpe"="video/x-mpeg"
".mpeg"="video/mpg"
".mpg"="video/mpg"
".mpga"="audio/rn-mpeg"
".mpp"="application/vnd.ms-project"
".mps"="video/x-mpeg"
".mpt"="application/vnd.ms-project"
".mpv"="video/mpg"
".mpv2"="video/mpeg"
".mpw"="application/vnd.ms-project"
".mpx"="application/vnd.ms-project"
".mtx"="text/xml"
".mxp"="application/x-mmxp"
".net"="image/pnetvue"
".nrf"="application/x-nrf"
".nws"="message/rfc822"
".odc"="text/x-ms-odc"
".out"="application/x-out"
".p10"="application/pkcs10"
".p12"="application/x-pkcs12"
".p7b"="application/x-pkcs7-certificates"
".p7c"="application/pkcs7-mime"
".p7m"="application/pkcs7-mime"
".p7r"="application/x-pkcs7-certreqresp"
".p7s"="application/pkcs7-signature"
".pc5"="application/x-pc5"
".pci"="application/x-pci"
".pcl"="application/x-pcl"
".pcx"="application/x-pcx"
".pdf"="application/pdf"
".pdf"="application/pdf"
".pdx"="application/vnd.adobe.pdx"
".pfx"="application/x-pkcs12"
".pgl"="application/x-pgl"
".pic"="application/x-pic"
".pko"="application/vnd.ms-pki.pko"
".pl"="application/x-perl"
".plg"="text/html"
".pls"="audio/scpls"
".plt"="application/x-plt"
".png"="image/png"
".png"="application/x-png"
".pot"="application/vnd.ms-powerpoint"
".ppa"="application/vnd.ms-powerpoint"
".ppm"="application/x-ppm"
".pps"="application/vnd.ms-powerpoint"
".ppt"="application/vnd.ms-powerpoint"
".ppt"="application/x-ppt"
".pr"="application/x-pr"
".prf"="application/pics-rules"
".prn"="application/x-prn"
".prt"="application/x-prt"
".ps"="application/x-ps"
".ps"="application/postscript"
".ptn"="application/x-ptn"
".pwz"="application/vnd.ms-powerpoint"
".r3t"="text/vnd.rn-realtext3d"
".ra"="audio/vnd.rn-realaudio"
".ram"="audio/x-pn-realaudio"
".ras"="application/x-ras"
".rat"="application/rat-file"
".rdf"="text/xml"
".rec"="application/vnd.rn-recording"
".red"="application/x-red"
".rgb"="application/x-rgb"
".rjs"="application/vnd.rn-realsystem-rjs"
".rjt"="application/vnd.rn-realsystem-rjt"
".rlc"="application/x-rlc"
".rle"="application/x-rle"
".rm"="application/vnd.rn-realmedia"
".rmf"="application/vnd.adobe.rmf"
".rmi"="audio/mid"
".rmj"="application/vnd.rn-realsystem-rmj"
".rmm"="audio/x-pn-realaudio"
".rmp"="application/vnd.rn-rn_music_package"
".rms"="application/vnd.rn-realmedia-secure"
".rmvb"="application/vnd.rn-realmedia-vbr"
".rmx"="application/vnd.rn-realsystem-rmx"
".rnx"="application/vnd.rn-realplayer"
".rp"="image/vnd.rn-realpix"
".rpm"="audio/x-pn-realaudio-plugin"
".rsml"="application/vnd.rn-rsml"
".rt"="text/vnd.rn-realtext"
".rtf"="application/msword"
".rtf"="application/x-rtf"
".rv"="video/vnd.rn-realvideo"
".sam"="application/x-sam"
".sat"="application/x-sat"
".sdp"="application/sdp"
".sdw"="application/x-sdw"
".sit"="application/x-stuffit"
".slb"="application/x-slb"
".sld"="application/x-sld"
".slk"="drawing/x-slk"
".smi"="application/smil"
".smil"="application/smil"
".smk"="application/x-smk"
".snd"="audio/basic"
".sol"="text/plain"
".sor"="text/plain"
".spc"="application/x-pkcs7-certificates"
".spl"="application/futuresplash"
".spp"="text/xml"
".ssm"="application/streamingmedia"
".sst"="application/vnd.ms-pki.certstore"
".stl"="application/vnd.ms-pki.stl"
".stm"="text/html"
".sty"="application/x-sty"
".svg"="text/xml"
".swf"="application/x-shockwave-flash"
".tdf"="application/x-tdf"
".tg4"="application/x-tg4"
".tga"="application/x-tga"
".tif"="image/tiff"
".tif"="application/x-tif"
".tiff"="image/tiff"
".tld"="text/xml"
".top"="drawing/x-top"
".torrent"="application/x-bittorrent"
".tsd"="text/xml"
".txt"="text/plain"
".uin"="application/x-icq"
".uls"="text/iuls"
".vcf"="text/x-vcard"
".vda"="application/x-vda"
".vdx"="application/vnd.visio"
".vml"="text/xml"
".vpg"="application/x-vpeg005"
".vsd"="application/vnd.visio"
".vsd"="application/x-vsd"
".vss"="application/vnd.visio"
".vst"="application/vnd.visio"
".vst"="application/x-vst"
".vsw"="application/vnd.visio"
".vsx"="application/vnd.visio"
".vtx"="application/vnd.visio"
".vxml"="text/xml"
".wav"="audio/wav"
".wax"="audio/x-ms-wax"
".wb1"="application/x-wb1"
".wb2"="application/x-wb2"
".wb3"="application/x-wb3"
".wbmp"="image/vnd.wap.wbmp"
".wiz"="application/msword"
".wk3"="application/x-wk3"
".wk4"="application/x-wk4"
".wkq"="application/x-wkq"
".wks"="application/x-wks"
".wm"="video/x-ms-wm"
".wma"="audio/x-ms-wma"
".wmd"="application/x-ms-wmd"
".wmf"="application/x-wmf"
".wml"="text/vnd.wap.wml"
".wmv"="video/x-ms-wmv"
".wmx"="video/x-ms-wmx"
".wmz"="application/x-ms-wmz"
".wp6"="application/x-wp6"
".wpd"="application/x-wpd"
".wpg"="application/x-wpg"
".wpl"="application/vnd.ms-wpl"
".wq1"="application/x-wq1"
".wr1"="application/x-wr1"
".wri"="application/x-wri"
".wrk"="application/x-wrk"
".ws"="application/x-ws"
".ws2"="application/x-ws"
".wsc"="text/scriptlet"
".wsdl"="text/xml"
".wvx"="video/x-ms-wvx"
".xdp"="application/vnd.adobe.xdp"
".xdr"="text/xml"
".xfd"="application/vnd.adobe.xfd"
".xfdf"="application/vnd.adobe.xfdf"
".xhtml"="text/html"
".xls"="application/vnd.ms-excel"
".xls"="application/x-xls"
".xlw"="application/x-xlw"
".xml"="text/xml"
".xpl"="audio/scpls"
".xq"="text/xml"
".xql"="text/xml"
".xquery"="text/xml"
".xsd"="text/xml"
".xsl"="text/xml"
".xslt"="text/xml"
".xwd"="application/x-xwd"
".x_b"="application/x-x_b"
".x_t"="application/x-x_t"
下载地址
1、下载后安装、右键选择vs2005中的项目、会出现一个选项"Add Web Deployment Project"(http://www.cnblogs.com/chy710)

2、选择添加一个WebDeployment Project(输入程序集名称和发布地址)

3、此时解决方案中会多出一个项目(http://www.cnblogs.com/chy710)

4、右键选择该项目设置相应属性

5、右键选择该项目选择“生成”、此时会发布网站到指定的目录、生成DLL文件同vs2003一样、更新时只需上传DLL文件
(http://www.cnblogs.com/chy710)
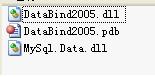
WDP
2000/XP/2003 下 IIS+PHP+MySQL+Zend Optimizer+GD库+phpMyAdmin安装配置
(假设 C:\ 为你现在所使用操作系统的系统盘,如果你目前操作系统不是安装在 C:\ ,请自行修改。)
一、安装 IIS(Windows2003只要安装“应用程序服务器(IIS,ASP.NET)”即可跳过此步):
(1)插入系统盘;
(2)进入控制面板-》添加或删除程序-》添加/删除Windows组件-》在“Internet信息服务(IIS)打勾-》下一步安装。
(3)安装完成后在浏览器地址栏输入 htt://127.0.0.1 检查是否安装正常。
如果没有系统盘,那么下载 IIS 5.1 的安装包(for XP),重复上述步骤,安装时指定路径即可。
IIS下载地址:http://soft.mumayi.net/downinfo/2597.html
二、安装 PHP:
(1)官方下载:http://www.php.net/downloads.php。
(2)下载后得到 php 的 zip 压缩包,解压至 C:\php(这个路径可以随意,下面要是用到这个路径,请相应修改);
(3)将 C:\php\libmysql.dll 和 C:\php\ext\php_mysql.dll 复制到 C:\Windows\system32 下;
将 C:\php\php.ini-recommended 复制到 C:\Windows (Windows 2000 下为 C:\WINNT)并将改名为php.ini,
然后用记事本打开,利用记事本的查找功能搜索:
搜索“; Windows Extensions”并仅打开需要的模块以节省内存(去掉每个模块前的;号即可):
extension=php_gd2.dll
GD库支持,支持水印。
extension=php_mbstring.dll
支持phpMyAdmin
extension=php_mysql.dll
支持MySQL。
(4)配置 IIS 使其支持 PHP
在“控制面板”的“管理工具”中选择“Internet 服务管理器”,
然后在左侧选择你需要支持 PHP 的 Web 站点上单击右键选择“属性”,
在打开的“Web 站点属性”窗口的“ISAPI 筛选器”标签里找到并点击“添加”按钮,在弹出的“筛选器属性”窗口中的“筛选器名称”栏中输入:PHP,再将可执行文件指向 php5isapi.dll 所在路径,如:C:\php\php5isapi.dll。
打开“Web 站点属性”窗口的“主目录”标签,找到并点击“配置”按钮,在弹出的“应用程序配置”窗口中找到并点击“添加”按钮,在弹出的窗口中新增一个扩展名映射,扩展名为 .php ,单击“浏览”将可执行文件指向 php5isapi.dll 所在路径,如:C:\php\php5isapi.dll,然后一路确定即可。
再打开“Web 站点属性”窗口的“文档”标签,找到并点击“添加”按钮,向默认的 Web 站点启动文档列表中添加 index.php 项。您可以将 index.php 升到最高优先级,这样,访问站点时就会首先自动寻找并打开 index.php 文档。
确定 Web 目录的应用程序设置和执行许可中选择为纯脚本,然后关闭 Internet 信息服务管理器。
2003系统配置:在“Internet 服务管理器”左边的“WEB服务扩展”中设置:
ISAPI 扩展允许
开始-》运行-》输入“iisreset”,重启IIS。
在 IIS 根目录下新建一个 phpinfo.php,内容如下:
<?php
phpinfo();
?>
打开浏览器,输入:http://127.0.0.1/phpinfo.php,将显示当前服务器所支持 PHP 的全部信息。
三、安装 MySQL:
(1)官方下载:http://dev.mysql.com/downloads/mysql/5.2.html
custom
安装
Skip Sign-Up
Finish
Next
Standard Comfiguration
设置数据库密码
(重要)重新启动电脑!
四、安装 Zend Optimizer :(有需要时安装)
(1)官方下载:http://www.zend.com/products/zend_optimizer
(2)安装时只需选择Web服务器为iis,指定php.ini路径即可。
五、安装 phpMyAdmin:(用于管理MYSQL数据库,可选择)
下载 http://www.phpmyadmin.net,将其解压到站点根目录,
找到 ./libraties/config.default.php,做以下修改:
方案一:
搜索 $cfg['Servers'][$i]['auth_type'] 设置为config
搜索 $cfg['Servers'][$i]['user'] 用户名一般为root
搜索 $cfg['Servers'][$i]['password'] 设置MySQL的密码
打开浏览器,输入:http://127.0.0.1/phpMyAdmin/ ,若 IIS 和 MySQL 均已启动,即可浏览数据库内容。
(此设置允许任何人通过以上路径登录管理数据库,安全性极低)
方案二:
搜索 $cfg['Servers'][$i]['auth_type'] 设置为cookie
搜索 $cfg['Servers'][$i]['user'] 用户名一般为root
搜索 $cfg['PmaAbsoluteUri'] 访问路径,设置为http://127.0.0.1/phpmyadmin/
搜索 $cfg['blowfish_secret'] 这是cookie作用域,设置为127.0.0.1
(此设置只允许本机上登录,并且需要输入用户名密码才能登录,安全性极高)
-----------------------------------------------------------------------------------
至此所有安装完毕。以上配置在所有老版本软件中不一定有效,强烈推荐下载最新版本的软件。