

最小化安装 CentOS 6.4,配置网络
一条一条执行:
yum -y update
yum -y install wget
yum -y install vim
yum -y install screen
screen -S lnmp
安装 LNMP:http://lnmp.org/install.html
下载安装一条龙
不要升级各软件,以防不测
PHP 防跨站:执行一段命令,替换 vhost.sh 文件,以后添加网站就会自动添加 HOST 防跨站、跨目录的配置
更改数据库路径(/home/mysql/var)
http://bbs.vpser.net/thread-1558-1-1.html 第20条
端口(为了 pureftpd 能安装成功,还是不要改端口了)
防火墙加端口
vim /etc/sysconfig/iptables
service iptables restart
FreeTDS:使 php 支持 mssql
安装 PureFTPd
添加FTP用户时,UID和GID必须>1000,譬如添加一个xWeb组和用户:
groupadd -g 2000 xWeb
useradd -u 2000 -g xWeb -s /sbin/nologin -M userDefault
useradd -u 2001 -g xWeb -s /sbin/nologin -M userFang
useradd -u 2002 -g xWeb -s /sbin/nologin -M user2
useradd -u 2003 -g xWeb -s /sbin/nologin -M user3
然后 chown xUser:xWeb -R /home/wwwroot/网站目录
这样PHP木马就不能上传。非www用户每站一个,防止跨站
要写入的目录chown为www用户,这样PHP能创建目录及上传文件,允许公共写入,使FTP能操作写入(未验证PHP创建的新目录FTP有没有写入权限,即继承),所有要写入的目录必须 deny all
chown userFang:xWeb -R /home/wwwroot/fang.eyuyao.com/
chown www:www -R /home/wwwroot/fang.eyuyao.com/uploads/
chown www:www -R /home/wwwroot/fang.eyuyao.com/eyy/src/
chown www:www -R /home/wwwroot/fang.eyuyao.com/index/Runtime/
chown www:www -R /home/wwwroot/fang.eyuyao.com/admin/Runtime/
—————————————————————————————————
#设置目录不允许执行PHP(其实是使符合正则的路径不可读)
#找到网站的 .conf 配置文件,在 location ~ .*\.(php|php5)?$ 的上面插入:
location ~ /upload/.*\.(php|php5)?$
{
deny all;
}
#支持 ThinkPHP(使用 rewrite)
location ~ /index\.php/.*$
{
if (!-e $request_filename) {
rewrite ^/index\.php(/.*)$ /index.php?s=$1 last;
break;
}
}
—————————————————————————————————
重启 LNMP /root/lnmp restart
重启 MySQL /etc/init.d/mysql restart
重启 PureFTPd /root/pureftpd restart
查看 Nginx 版本 nginx -V
查看 MySQL 版本 mysql -V
查看 PNP 版本 php -v
查看 Apache 版本 httpd -v
查内存 cat /proc/meminfo
php.ini vim /usr/local/php/etc/php.ini
iptables 路径 /etc/sysconfig/iptables
MySQL 配置文件 vim /etc/my.cnf
添加网站 /root/vhost.sh
添加ProFTPd用户 /root/proftpd_vhost.sh
—————————————————————————————————
遇到问题:
中文URL问题解决方案,FTP用强制UTF-8,单个文件传。否则在win下打包的zip在linux下解压后,编码不是utf-8,导致打开URL 404
能用记事本打开的文件若包含中文,应另存为 utf-8 编码。
ThinkPHP 项目修改配置文件后,必须删除 /index/Runtime/* 缓存文件!!!

前言
最近在学习Web Api框架的时候接触到了async/await,这个特性是.NET 4.5引入的,由于之前对于异步编程不是很了解,所以花费了一些时间学习一下相关的知识,并整理成这篇博客,如果在阅读的过程中发现不对的地方,欢迎大家指正。
同步编程与异步编程
通常情况下,我们写的C#代码就是同步的,运行在同一个线程中,从程序的第一行代码到最后一句代码顺序执行。而异步编程的核心是使用多线程,通过让不同的线程执行不同的任务,实现不同代码的并行运行。
前台线程与后台线程
关于多线程,早在.NET2.0时代,基础类库中就提供了Thread实现。默认情况下,实例化一个Thread创建的是前台线程,只要有前台线程在运行,应用程序的进程就一直处于运行状态,以控制台应用程序为例,在Main方法中实例化一个Thread,这个Main方法就会等待Thread线程执行完毕才退出。而对于后台线程,应用程序将不考虑其是否执行完毕,只要应用程序的主线程和前台线程执行完毕就可以退出,退出后所有的后台线程将被自动终止。来看代码应该更清楚一些:
using System;
using System.Collections.Generic;
using System.Linq;
using System.Text;
using System.Threading;
using System.Threading.Tasks;

namespace ConsoleApp
{
    class Program
    {
        static void Main(string[] args)
        {
            Console.WriteLine("主线程开始");

            //实例化Thread,默认创建前台线程
            Thread t1 = new Thread(DoRun1);
            t1.Start();

            //可以通过修改Thread的IsBackground,将其变为后台线程
            Thread t2 = new Thread(DoRun2) { IsBackground = true };
            t2.Start();

            Console.WriteLine("主线程结束");
        }

        static void DoRun1()
        {
            Thread.Sleep(500);
            Console.WriteLine("这是前台线程调用");
        }

        static void DoRun2()
        {
            Thread.Sleep(1500);
            Console.WriteLine("这是后台线程调用");
        }
    }
}
运行上面的代码,可以看到DoRun2方法的打印信息“这是后台线程调用”将不会被显示出来,因为应用程序执行完主线程和前台线程后,就自动退出了,所有的后台线程将被自动终止。这里后台线程设置了等待1.5s,假如这个后台线程比前台线程或主线程提前执行完毕,对应的信息“这是后台线程调用”将可以被成功打印出来。
Task
.NET 4.0推出了新一代的多线程模型Task。async/await特性是与Task紧密相关的,所以在了解async/await前必须充分了解Task的使用。这里将以一个简单的Demo来看一下Task的使用,同时与Thread的创建方式做一下对比。
using System;
using System.Collections.Generic;
using System.Linq;
using System.Text;
using System.Web;
using System.Threading;
using System.Threading.Tasks;

namespace TestApp
{
    class Program
    {
        static void Main(string[] args)
        {
            Console.WriteLine("主线程启动");

            //.NET 4.5引入了Task.Run静态方法来启动一个线程
            Task.Run(() => { Thread.Sleep(1000); Console.WriteLine("Task1启动"); });

            //Task启动的是后台线程,假如要在主线程中等待后台线程执行完毕,可以调用Wait方法
            Task task = Task.Run(() => { Thread.Sleep(500); Console.WriteLine("Task2启动"); });
            task.Wait();

            Console.WriteLine("主线程结束");
        }
    }
}
首先,必须明确一点是Task启动的线程是后台线程,不过可以通过在Main方法中调用task.Wait()方法,使应用程序等待task执行完毕。Task与Thread的一个重要区分点是:Task底层是使用线程池的,而Thread每次实例化都会创建一个新的线程。这里可以通过这段代码做一次验证:
using System;
using System.Collections.Generic;
using System.Linq;
using System.Text;
using System.Web;
using System.Threading;
using System.Threading.Tasks;

namespace TestApp
{
    class Program
    {
        static void DoRun1()
        {
            Console.WriteLine("Thread Id =" + Thread.CurrentThread.ManagedThreadId);
        }

        static void DoRun2()
        {
            Thread.Sleep(50);
            Console.WriteLine("Task调用Thread Id =" + Thread.CurrentThread.ManagedThreadId);
        }

        static void Main(string[] args)
        {
            for (int i = 0; i < 50; i++)
            {
                new Thread(DoRun1).Start();
            }

            for (int i = 0; i < 50; i++)
            {
                Task.Run(() => { DoRun2(); });
            }

            //让应用程序不立即退出
            Console.Read();
        }
    }
}
运行代码,可以看到DoRun1()方法每次的Thread Id都是不同的,而DoRun2()方法的Thread Id是重复出现的。我们知道线程的创建和销毁是一个开销比较大的操作,Task.Run()每次执行将不会立即创建一个新线程,而是到CLR线程池查看是否有空闲的线程,有的话就取一个线程处理这个请求,处理完请求后再把线程放回线程池,这个线程也不会立即撤销,而是设置为空闲状态,可供线程池再次调度,从而减少开销。
Task<TResult>
Task<TResult>是Task的泛型版本,这两个之间的最大不同是Task<TResult>可以有一个返回值,看一下代码应该一目了然:
using System;
using System.Collections.Generic;
using System.Linq;
using System.Text;
using System.Web;
using System.Threading;
using System.Threading.Tasks;

namespace TestApp
{
    class Program
    {
        static void Main(string[] args)
        {
            Console.WriteLine("主线程开始");

            Task task = Task.Run(() => { Thread.Sleep(1000); return Thread.CurrentThread.ManagedThreadId.ToString(); });
            Console.WriteLine(task.Result);

            Console.WriteLine("主线程结束");
        }
    }
}
Task<TResult>的实例对象有一个Result属性,当在Main方法中调用task.Result的时候,将等待task执行完毕并得到返回值,这里的效果跟调用task.Wait()是一样的,只是多了一个返回值。
async/await 特性
经过前面的铺垫,终于迎来了这篇文章的主角async/await,还是先通过代码来感受一下这两个特性的使用。
using System;
using System.Collections.Generic;
using System.Linq;
using System.Text;
using System.Web;
using System.Threading;
using System.Threading.Tasks;

namespace TestApp
{
    class Program
    {
        static void Main(string[] args)
        {
            Console.WriteLine("-------主线程启动-------");
            Task task = GetLengthAsync();
            Console.WriteLine("Main方法做其他事情");
            Console.WriteLine("Task返回的值" + task.Result);
            Console.WriteLine("-------主线程结束-------");
        }

        static async Task GetLengthAsync()
        {
            Console.WriteLine("GetLengthAsync Start");
            string str = await GetStringAsync();
            Console.WriteLine("GetLengthAsync End");
            return str.Length;
        }

        static Task GetStringAsync()
        {
            return Task.Run(() => { Thread.Sleep(2000); return "finished"; });
        }
    }
}
首先来看一下async关键字。async用来修饰方法,表明这个方法是异步的,声明的方法的返回类型必须为:void或Task或Task<TResult>。返回类型为Task的异步方法中无需使用return返回值,而返回类型为Task<TResult>的异步方法中必须使用return返回一个TResult的值,如上述Demo中的异步方法返回一个int。而返回类型可为void,则是为了和事件处理程序兼容,比如下面的示例:
public Form1()
{
    InitializeComponent();
    btnDo.Click += Down;
}

public async void Down(object sender, EventArgs e)
{
    btnDo.Enabled = false;
    string str = await Run();
    labText.Text = str;
    btnDo.Enabled = true;
}

public Task Run()
{
    return Task.Run(() => { Thread.Sleep(5000); return DateTime.Now.ToString(); });
}
再来看一下await关键字。await必须用来修饰Task或Task<TResult>,而且只能出现在已经用async关键字修饰的异步方法中。
通常情况下,async/await必须成对出现才有意义,假如一个方法声明为async,但却没有使用await关键字,则这个方法在执行的时候就被当作同步方法,这时编译器也会抛出警告提示async修饰的方法中没有使用await,将被作为同步方法使用。了解了关键字async\await的特点后,我们来看一下上述Demo在控制台会输入什么吧。

输出的结果已经很明确地告诉我们整个执行流程了。GetLengthAsync异步方法刚开始是同步执行的,所以"GetLengthAsync Start"字符串会被打印出来,直到遇到第一个await关键字,真正的异步任务GetStringAsync开始执行,await相当于起到一个标记/唤醒点的作用,同时将控制权放回给Main方法,"Main方法做其他事情"字符串会被打印出来。之后由于Main方法需要访问到task.Result,所以就会等待异步方法GetLengthAsync的执行,而GetLengthAsync又等待GetStringAsync的执行,一旦GetStringAsync执行完毕,就会回到await GetStringAsync这个点上执行往下执行,这时"GetLengthAsync End"字符串就会被打印出来。
当然,我们也可以使用下面的方法完成上面控制台的输出。
using System;
using System.Collections.Generic;
using System.Linq;
using System.Text;
using System.Web;
using System.Threading;
using System.Threading.Tasks;

namespace TestApp
{
    class Program
    {
        static void Main(string[] args)
        {
            Console.WriteLine("-------主线程启动-------");
            Task task = GetLengthAsync();
            Console.WriteLine("Main方法做其他事情");
            Console.WriteLine("Task返回的值" + task.Result);
            Console.WriteLine("-------主线程结束-------");
        }

        static Task GetLengthAsync()
        {
            Console.WriteLine("GetLengthAsync Start");
            Task task = Task.Run(() => { string str = GetStringAsync().Result;
                Console.WriteLine("GetLengthAsync End");
                return str.Length; });
            return task;
        }

        static Task GetStringAsync()
        {
            return Task.Run(() => { Thread.Sleep(2000); return "finished"; });
        }
    }
}
对比两种方法,是不是async\await关键字的原理其实就是通过使用一个线程完成异步调用吗?答案是否定的。async关键字表明可以在方法内部使用await关键字,方法在执行到await前都是同步执行的,运行到await处就会挂起,并返回到Main方法中,直到await标记的Task执行完毕,才唤醒回到await点上,继续向下执行。更深入点的介绍可以查看文章末尾的参考文献。
async/await 实际应用
微软已经对一些基础类库的方法提供了异步实现,接下来将实现一个例子来介绍一下async/await的实际应用。
using System;
using System.Collections.Generic;
using System.Linq;
using System.Text;
using System.Web;
using System.Threading;
using System.Threading.Tasks;
using System.Net;

namespace TestApp
{
    class Program
    {
        static void Main(string[] args)
        {
            Console.WriteLine("开始获取博客园首页字符数量");
            Task task1 = CountCharsAsync("http://www.cnblogs.com");
            Console.WriteLine("开始获取百度首页字符数量");
            Task task2 = CountCharsAsync("http://www.baidu.com");

            Console.WriteLine("Main方法中做其他事情");

            Console.WriteLine("博客园:" + task1.Result);
            Console.WriteLine("百度:" + task2.Result);
        }

        static async Task CountCharsAsync(string url)
        {
            WebClient wc = new WebClient();
            string result = await wc.DownloadStringTaskAsync(new Uri(url));
            return result.Length;
        }
    }
}
参考文献:<IIIustrated C# 2012> 关于async/await的FAQ 《深入理解C#》
VS 2015 启动调试时报“无法启动 IIS Express Web 服务器”,或 IIS Express 启动了,但网页无法打开,除了百度告诉你的方法,可以试试:
网站项目 右键属性 - “Web”选项卡 - 点击“项目 URL”右侧的“创建虚拟目录”
在开发微信中的网页时,会遇到一些域名相关的配置:
① 公众号设置 - 功能设置 - 业务域名
② 公众号设置 - 功能设置 - JS接口安全域名
③ 接口权限 - 网页授权获取用户基本信息
④ 商户平台 - 产品中心 - 开发配置 - JSAPI支付授权目录
⑤ 小程序 - 开发 - 开发设置 - 业务域名
⑥ 公众号开发 - 基本设置 - IP白名单
第①种 业务域名:相对不重要,只是用来禁止显示“防欺诈盗号,请勿支付或输入qq密码”提示框,可配置 3 个二级或二级以上域名(个人理解是“非顶级域名”,即填写了 b.a.com 的话,对 c.b.a.com 不起作用,待测)。
我们网站的域名和公众号是没有绑定关系的,那么你在打开一个(可能是朋友分享的)网页时,跟哪个公众号的配置去关联呢,答案是 JS-SDK。
测试结果:由于一个月只有3次修改机会,这次先测二级域名,有效;再测顶级域名,有效;删除所有,仍有效。所以应该是缓存作用。过几天再试,然后下个月先测顶级域名,来确定直接填写顶级域名是否对所有二级域名有效。
第②种 JS接口安全域名:是配置所配置的域名下的网页可调用 JS-SDK。可配置 5 个一级或一级以上域名(个人理解是“任何级域名”,即填写了 b.a.com 对 c.b.a.com 也有效,但对 c.z.a.com 无效,待测。如果我们拥有顶级域名对应网站的控制权(上传验证文件到网站根目录),直接填写顶级域名即可)。
使用 JS-SDK 的每个网页都必须注入配置信息(wx.config),而之前必须获取 jsapi_ticket,jsapi_ticket api 的调用次数非常有限,必须全局缓存。而获取 jsapi_ticket 之前必须先获取 access_token,同样需要全局缓存。所以,我们专门做个接口,功能是传入需要使用 JS-SDK 的网页的 url,输出 wx.config 需要用到的配置信息,来实现在不同网页(网站)使用 JS-SDK。
第③种 网页授权域名:这是已认证的服务号才能享有的特权,主要作用是获取用户在该服务号中的 openid 和 unionid。可配置 1 个 2 个回调域名(可填写任意级别的域名,但仅对该域名的网页(网站)有效,若填写了 a.com 对 b.a.com 是无效的)。
因此,如果我们需要在不同二级域名甚至不同顶级域名下的网页(以下称之为活动页面)实现用户授权,需要做一个统一的代理授权页面(回调域名当然是填写这个页面所在的域名),引导用户依次打开:微信授权页面 - 代理授权页面 - 活动页面,根据开发说明文档,具体实现如下:
当用户第一次打开活动页面时,引导打开微信授权页面(https://open.weixin.qq.com/connect/oauth2/authorize),其中参数 redirect_uri 指定回调地址,即代理授权页面地址,参数 state 指定活动页面地址。微信授权页面返回 code 和 state,code 作为换取网页授权 access_token 的票据。到这一步,本来可以由代理授权页面直接拿这个 code 去换取 access_token、openid 和 unionid 了,但是由于当前用户还在 302 重定向过程中,将这些信息带入到活动页面时势必导致信息泄露,所以这里将 code 追加到 state 指定的网址上后重定向到活动页面,活动页面拿到 code 再通过服务器端向代理授权页面所在服务器请求 openid 和 unionid,并将它们保存于 Session 中视为用户登录。这样,服务号的 appid 和 secret 也能得到保护。代理授权页面请求的微信服务器接口地址是 https://api.weixin.qq.com/sns/oauth2/access_token。
注:网页授权 access_token 不同于 JS-SDK 中使用的全局唯一接口调用凭据 access_token,没有请求次数限制。
流程既然通了,实现逻辑可以这样设定:
活动页面首先判断 Session 中是否有 openid 或 unionid,若有表示已授权登录;没有再判断地址栏是否有 code 参数,若有则调用代理授权页面所在服务器的接口,用 code 换 openid 和 unionid;没有则直接重定向到代理授权页面,带上 state。用 code 换 openid 和 unionid 时若成功则保存至 Session,若失败则仍然重定向到代理授权页面,带上 state,特别注意 state 中的活动页面地址确保没有 code 参数。
第④种 JSAPI支付授权目录:涉及到微信支付时用到,顾名思义是固定某一个网站内的某个目录,以“/”结尾。最多可添加 5 个。如果支付页面在目录 https://www.a.com/b/ 下,那么可以填写 https://www.a.com/b/ 或 https://www.a.com/(建议后者),暂未测试填写 https://a.com/ 会不会起作用。涉及支付安全,建议设置支付页面的最深一层不可写的目录,以防目录内被上传后门文件带来的安全隐患。
第⑤种 小程序业务域名:任何需要在小程序的 web-view 组件中打开的网页,都必须配置小程序业务域名,限制 20 个。该域名要求必须 https,可填入“任何级域名”(建议填顶级域名,即填写了 a.com 对 b.a.com 也有效。如果我们拥有顶级域名对应网站的控制权(上传验证文件到网站根目录),直接填写顶级域名即可)。
第⑥种 IP白名单:仅填写管理全局 access_token 的中控服务器的 IP。
总结:在上述自定义接口部署完成后,如果微信中的网页想获取用户的 unionid,则不需要配置域名,直接使用统一的代理授权即可;如果需要使用 JS-SDK 功能,如分享、上传等等,则需要配置 JS 接口安全域名;如果有表单,最好配置一下业务域名。
本文系个人经验总结,部分结果未经证实,欢迎指正!QQ:940534113
在 ASP.NET Core 或 ASP.NET 5 中部署百度编辑器请跳转此文。
本文记录百度编辑器 ASP.NET 版的部署过程,对其它语言版本也有一定的参考价值。
【2020.02.21 重新整理】
下载
从 GitHub 下载最新发布版本:https://github.com/fex-team/ueditor/releases
按编码分有 gbk 和 utf8 两种版本,按服务端编程语言分有 asp、jsp、net、php 四种版本,按需下载。
目录介绍
以 v1.4.3.3 utf8-net 为例,

客户端部署
本例将上述所有目录和文件拷贝到网站目录 /libs/ueditor/ 下。
当然也可以引用 CDN 静态资源,但会遇到诸多跨域问题,不建议。
在内容编辑页面引入:
<script src="/libs/ueditor/ueditor.config.js"></script>
<script src="/libs/ueditor/ueditor.all.min.js"></script>
在内容显示页面引入:
<script src="/libs/ueditor/ueditor.parse.min.js"></script>如需修改编辑器资源文件根路径,参 ueditor.config.js 文件内顶部文件。(一般不需要单独设置)
如果使用 CDN,那么在初始化 UE 实例的时候应配置 serverUrl 值(即 controller.ashx 所在路径)。
客户端配置
初始化 UE 实例:
var ue = UE.getEditor('tb_content', {
    // serverUrl: '/libs/ueditor/net/controller.ashx', // 指定服务端接收文件路径
    initialFrameWidth: '100%'
});
其它参数见官方文档,或 ueditor.config.js 文件。
服务端部署
net 目录是 ASP.NET 版的服务端程序,用来实现接收上传的文件等功能。
本例中在网站中的位置是 /libs/ueditor/net/。如果改动了位置,那么在初始化 UE 的时候也应该配置 serverUrl 值。
这是一个完整的 VS 项目,可以单独部署为一个网站。其中:
net/config.json 服务端配置文件
net/controller.ashx 文件上传入口
net/App_Code/CrawlerHandler.cs 远程抓图动作
net/App_Code/ListFileManager.cs 文件管理动作
net/App_Code/UploadHandler.cs 上传动作
该目录不需要转换为应用程序。
服务端配置
根据 config.json 中 *PathFormat 的默认配置,一般地,上传的图片会保存在 controller.ashx 文件所在目录(即本例中的 /libs/ueditor/)的 upload 目录中:
/libs/ueditor/upload/image/
原因是 UploadHandler.cs 中 Server.MapPath 的参数是由 *PathFormat 决定的。
以修改 config.json 中的 imagePathFormat 为例:
原值:"imagePathFormat": "upload/image/{yyyy}{mm}{dd}/{time}{rand:6}"
改为:"imagePathFormat": "/upload/ueditor/{yyyy}{mm}{dd}/{time}{rand:6}"
以“/”开始的路径在 Server.MapPath 时会定位到网站根目录。
此处不能以“~/”开始,因为最终在客户端显示的图片路径是 imageUrlPrefix + imagePathFormat,若其中包含符号“~”就无法正确显示。
在该配置文件中查找所有 PathFormat,按相同的规则修改。
说到客户端的图片路径,我们只要将
原值:"imageUrlPrefix": "/ueditor/net/"
改为:"imageUrlPrefix": ""
即可返回客户端正确的 URL。
当然也要同步修改 scrawlUrlPrefix、snapscreenUrlPrefix、catcherUrlPrefix、videoUrlPrefix、fileUrlPrefix。
特殊情况,在复制包含图片的网页内容的操作中,若图片地址带“?”等符号,会出现无法保存到磁盘的情况,需要修改以下代码:
打开 CrawlerHandler.cs 文件,找到
ServerUrl = PathFormatter.Format(Path.GetFileName(this.SourceUrl), Config.GetString("catcherPathFormat"));替换成:
ServerUrl = PathFormatter.Format(Path.GetFileName(SourceUrl.Contains("?") ? SourceUrl.Substring(0, SourceUrl.IndexOf("?")) : SourceUrl), Config.GetString("catcherPathFormat"));如果你将图片保存到第三方图库,那么 imageUrlPrefix 值设为相应的域名即可,如:
改为:"imageUrlPrefix": "//cdn.***.com"
然后在 UploadHandler.cs 文件(用于文件上传)中找到
File.WriteAllBytes(localPath, uploadFileBytes);在其下方插入上传到第三方图库的代码,以阿里云 OSS 为例:
// 上传到 OSS
client.PutObject(bucketName, savePath.Substring(1), localPath);
在 CrawlerHandler.cs 文件(无程抓图上传)中找到
File.WriteAllBytes(savePath, bytes);在其下方插入上传到第三方图库的代码,以阿里云 OSS 为例:
// 上传到 OSS
client.PutObject(bucketName, ServerUrl.Substring(1), savePath);
最后有还有两个以 UrlPrefix 结尾的参数名 imageManagerUrlPrefix 和 fileManagerUrlPrefix 分别是用来列出上传目录中的图片和文件的,
对应的操作是在编辑器上的“多图上传”功能的“在线管理”,和“附件”功能的“在线附件”。
最终列出的图片路径是由 imageManagerUrlPrefix + imageManagerListPath + 图片 URL 组成的,那么:
"imageManagerListPath": "/upload/ueditor/image",
"imageManagerUrlPrefix": "",
以及:
"fileManagerListPath": "/upload/ueditor/file",
"fileManagerUrlPrefix": "",
即可。
如果是上传到第三方图库的,且图库上的文件与本地副本是一致的,那么将 imageManagerUrlPrefix 和 fileManagerUrlPrefix 设置为图库域名,
服务端仍然以 imageManagerListPath 指定的路径来查找本地文件(非图库),但客户端显示图库的文件 URL。
因此,如果文件仅存放在图库上,本地没有副本的情况就无法使用该功能了。
综上,所有的 *UrlPrefix 应该设为一致。
另外记得配置不希望被远程抓图的域名,参数 catcherLocalDomain。
服务端授权
现在来判断一下只有登录用户才允许上传。
首先打开服务端的统一入口文件 controller.ashx,
继承类“IHttpHandler”改为“IHttpHandler, System.Web.SessionState.IRequiresSessionState”,即同时继承两个类,以便可使用 Session,
找到“switch”,其上插入:
if (用户未登录) { throw new System.Exception("请登录后再试"); }即用户已登录或 action 为获取 config 才进入 switch。然后,
else
{
    action = new NotAllowedHandler(context);
}
这里的 NotAllowedHandler 是参照 NotSupportedHandler 创建的,提示语 state 可以是“登录后才能进行此操作。”
上传目录权限设置
上传目录(即本例中的 /upload/ueditor/ 目录)应设置允许写入和禁止执行。
基本用法
设置内容:
ue.setContent("Hello world.");获取内容:
var a = ue.getContent();更多用法见官方文档:http://fex.baidu.com/ueditor/#api-common
其它事宜
配置上传附件的文件格式
找到文件:config.json,更改“上传文件配置”的 fileAllowFiles 项,
同时在 Web 服务器上允许这些格式的文件可访问权限。以 IIS 为例,在“MIME 类型”模块中添加扩展名。
遇到从客户端(......)中检测到有潜在危险的 Request.Form 值。请参考此文
另外,对于不支持上传 .webp 类型的图片的问题,可以作以下修改:
config.json 中搜索“".bmp"”,替换为“".bmp", ".webp"”
IIS 中选中对应网站或直接选中服务器名,打开“MIME 类型”,添加,文件扩展名为“.webp”,MIME 类型为“image/webp”
最后,为了在内容展示页面看到跟编辑器中相同的效果,请参照官方文档引用 uParse
若有插入代码,再引用:
<link href="/lib/ueditor/utf8-net/third-party/SyntaxHighlighter/shCoreDefault.css" rel="stylesheet" />
<script src="/lib/ueditor/utf8-net/third-party/SyntaxHighlighter/shCore.js"></script>
其它插件雷同。
若对编辑器的尺寸有要求,在初始化时设置即可:
var ue = UE.getEditor('tb_content', {
initialFrameWidth: '100%',
initialFrameHeight: 320
});
今天终于把大量占用论坛服务器带宽的元凶找到了!
我们的论坛使用阿里云的 ECS+RDS+OSS+CDN 架构,最近发现 ECS 的带宽怎么都不够用了,也没有什么突发事件呀,再说附件都在 OSS 上。观察了云监控控制台,发现半夜里的流量也不减呀,白天更是触顶下不来,坛友们真是不辞辛劳为 PV 作贡献啊。
我对 CentOS 还是不够熟悉的,查阅了一些资料后,终于找到方向入手了。
重点肯定是日志文件了,但是面对每天几个 G 的大块头,还真是无法下手,一条一条看估计胡子都白花花了。
那么,首先安装 GoAccess 这个好东西(yum install goaccess)
然后进入网站日志目录,用 GoAccess 来分析一下(goaccess -f xxxxxx.log -a),具体用法参官网
选择日志格式,nginx 默认为 NCSA Combined Log Format,空格选中,回车确认
稍等片刻就可以看到主界面了,统计信息丰富多彩,统计结果一目了然,看截图,如果你分析的日志文件是当前正在使用中的,它还会每秒刷新主界面,让你看到实时统计
大致分为几块内容:
按 1 定位到“按天访问量”
按 2 定位到“最多次被请求的 URL”
按 3 定位到“最多次被请求的静态文件”
按 4 定位到“最多次被请求的 404”
按 5 定位到“最多次请求的用户 IP”
按 6 定位到“用户的操作系统”
按 7 定位到“用户的浏览器”
按 8 定位到“按小时的统计”
按以上数字键后,再按回车可以查看具体或更多的信息,按 s 可以更换排序,按 q 返回或退出
那么我先找 5 最多次请求的用户 IP,排前面的全部是从 60.191.127.4 到 60.191.127.26 的 IP,每个 IP 都是几 G 级的带宽占用。
负责任的,你必须保证这些 IP 不是政府或大企业的对公 IP,而且得拿这些 IP 直接去日志文件里搜到底请求了哪些 URL。经查证,它们只请求版块的帖子列表页,没有请求任何图片、脚本、样式等,还有,UserAgent 中没有带 Spider 之类的关键字,证明不是搜索引擎的蜘蛛,那么就可以果断认为它“不是人”
啥都不说了,找到 nginx 的 conf 配置文件,在 server 中添加 deny 60.191.127.0/24;
检查配置:nginx -t
使配置生效:nginx -s reload
呵呵,马上就能在阿里云监控里看到过山车式的折线了。
另外,备注下查看各IP的连接数的命令:
netstat -an|grep :80| awk '{print $5}'| cut -d':' -f1| sort |uniq -c
本文适用于 IIS 7, IIS 7.5, IIS 8, IIS 8.5, IIS 10 等 Web 服务器,IIS 6(Windows Server 2003)用户请查阅 ISAPI_Rewrite。
在 IIS 中要实现 URL 重写,需要下载并安装 URL Rewrite 组件,http://www.iis.net/downloads/microsoft/url-rewrite
在 IIS 管理器中选中任意网站,主窗口可见“URL 重写”,双击打开。(如果你想配置这台服务器的所有网站有效,直接选中左侧菜单中的服务器名,打开“URL 重写”即可。)
右侧“添加规则...”,选择“入站规则”中的“空白规则”,确定。
填写规则名称,在“匹配 URL”框中选择“与模式匹配”,根据自己的需求选择“正则表达式”、“通配符”或“完全匹配”,“模式”中填写要防盗链的文件路径规则,例如正则表达式 ^.*\.(jpg|png)$ 将匹配所有目录下的 .jpg 和 .png 文件。
接下来将设置图片在允许的域名下显示。
在“条件”框中选择“全部匹配”,点击“添加”,“条件输入”中填写“{HTTP_REFERER}”(不含引号,含花括号),表示判断 HTTP 请求中 Header 的 Referer。选择“与模式不匹配”,模式中填写匹配规则,如 ^$ 表示允许 Referer 为空(如直接从浏览器打开的情况),再加一个规则 ^https?://([^/]*\.)?(xoyozo.net|himiao.com)/.*$ 表示允许在 xoyozo.net 和 himiao.com 这两个域名下显示图片。当然如果你有很多域名或需要设置不同的规则,可以继续添加,但最好把访问量大的规则移到前面,从而减少系统匹配次数,提高访问效率。
最后,在“操作”框中设置你想要的处理方式,可以是“重定向”到一张防盗链提醒的图片上(推荐类型临时 307),也可以自定义响应,例如,状态代码(403),子代码(0),原因(Forbidden: Access is denied.),描述(You do not have permission to view this directory or page using the credentials that you supplied.),查看 HTTP 状态代码。
如果你是配置某个网站的“URL 重写”,那么在网站根目录下的 web.config 文件中,<system.webServer /> 节点下可以看到刚刚配置的规则,例如:
<rewrite>
  <rules>
    <rule name="RequestBlockingRule1" stopProcessing="true">
      <match url="^.*\.(jpg|png)$" />
      <conditions>
        <add input="{HTTP_REFERER}" pattern="^https?://([^/]*\.)?(xoyozo.net|himiao.com)/.*$" negate="true" />
        <add input="{HTTP_REFERER}" pattern="^$" negate="true" />
      </conditions>
      <action type="Redirect" url="http://42.96.165.253/logo2013.png" redirectType="Temporary" />
    </rule>
  </rules>
</rewrite>
jQuery 请求代码:
$.ajax({
  url: "xxxxxx",
  //method: "GET", // 默认 GET(当 dataType 为 jsonp 时此参数无效,始终以 GET 方式请求)
  data: $('#myForm').serialize(), // 要传递的参数,这里提交表单 myForm 的内容
  dataType: "jsonp"
  //, jsonp: "callback" // 请求中的回调函数的参数名,默认值 callback
  //, jsonpCallback: "jQuery_abc" // 本地回调函数名,不指定则随机
})
  .done(function () {
    alert("done");
    if (true) {
      $('#myForm')[0].reset();
    }
  })
  .fail(function () { alert("fail"); })
  .always(function () { alert("complete"); });
ASP.NET 处理代码:
JavaScriptSerializer jss = new JavaScriptSerializer();

string json = jss.Serialize(new { result = new { success = true, msg = "成功" } });

if (!string.IsNullOrWhiteSpace(Request["callback"])
  && Regex.IsMatch(Request["callback"], @"[_$a-zA-Z][$\w]*"))
{
  Response.ContentType = "application/javascript; charset=utf-8";
  Response.Write(json + Request["callback"] + "(" + json + ")");
}
else
{
  Response.ContentType = "application/json; charset=utf-8";
  Response.Write(json);
}

Response.End();
最近有服务器不时出现的CPU使用率超高,内存几乎被吃光,系统甚至自动kill掉一些进程,如sshd,vsftpd等。用top查看,PHP-CGI进程高挂不下,如下是解决方案:
一、进程跟踪
# top //找出CPU使用率高的进程PID
# strace -p PID //跟踪进程
# ll /proc/PID/fd //查看该进程在处理哪些文件
将有可疑的PHP代码修改之,如:file_get_contents没有设置超时时间。
二、内存分配
如果进程跟踪无法找到问题所在,再从系统方面找原因,会不会有可能内存不够用?据说一个较为干净的PHP-CGI打开大概20M-30M左右的内存,决定于PHP模块开启多少。
通过pmap指令查看PHP-CGI进程的内存使用情况
# pmap $(pgrep php-cgi |head -1)
按输出的结果,结合系统的内存大小,配置PHP-CGI的进程数(max_children)。
三、监控
最后,还可以通过监控与自动恢复的脚本保证服务的正常运转。下面是我用到的一些脚本:
只要一个php-cgi进程占用的内存超过 %1 就把它kill掉
#!/bin/sh

PIDS=`ps aux|grep php-cgi|grep -v grep|awk’{if($4>=1)print $2}’`

for PID in $PIDS

do

echo `date +%F….%T`>>/data/logs/phpkill.log

echo $PID >> /data/logs/phpkill.log

kill -9 $PID

done
检测php-fpm进程
#!/bin/bash

netstat -tnlp | grep “php-cgi” >> /dev/null #2&> /data/logs/php_fasle.log

if [ "$?" -eq "1" ];then #&& [ `netstat -tnlp | grep 9000 | awk '{ print $4}' | awk -F ":" '{print $2}'` -eq "1" ];then

/usr/local/webserver/php/sbin/php-fpm start

echo `date +%F….%T` “System memory OOM.Kill php-cgi. php-fpm service start. ” >> /data/logs/php_monitor.log

fi
通过http检测php执行
#!/bin/bash

status=`curl -s –head “http://127.0.0.1:8080/chk.php” | awk ‘/HTTP/ {print $2}’`

if [ $status != "200" -a $status != "304" ]; then

/usr/local/webserver/php/sbin/php-fpm restart

echo `date +%F….%T` “php-fpm service restart” >> /data/logs/php_monitor.log

fi

编者按:今天腾讯万技师同学的这篇技术总结必须强烈安利下,目录清晰,层次分明,每个接口都有对应的简介、系统要求、实例、核心代码以及超实用的思维发散,帮你直观把这些知识点get起来。以现在HTML 5的势头,同志们,你看到的这些,可都是钱呐。
十二年前,无论多么复杂的布局,在我们神奇的table面前,都不是问题;
十年前,阿捷的一本《网站重构》,为我们开启了新的篇章;
八年前,我们研究yahoo.com,惊叹它在IE5下都表现得如此完美;
六年前,Web标准化成了我们的基础技能,我们开始研究网站性能优化;
四年前,我们开始研究自动化工具,自动化测试,谁没玩过nodejs都不好意思说是页面仔;
二年前,各种终端风起云涌,响应式、APP开发都成为了我们研究的范围,CSS3动画开始风靡;
如今,CSS3动画、Canvas、SVG、甚至webGL你已经非常熟悉,你是否开始探寻,接下来,我们可以玩什么,来为我们项目带来一丝新意?
没错,本文就是以HTML5 Device API为核心,对HTML5的一些新接口作了一个完整的测试,希望能让大家有所启发。
目录:
一、让音乐随心而动 – 音频处理 Web audio API
二、捕捉用户摄像头 – 媒体流 Media Capture
三、你是逗逼? – 语音识别 Web Speech API
四、让我尽情呵护你 – 设备电量 Battery API
五、获取用户位置 – 地理位置 Geolocation API
六、把用户捧在手心 – 环境光 Ambient Light API
七、陀螺仪 Deviceorientation
八、Websocket
九、NFC
十、震动 - Vibration API
十一、网络环境 Connection API
一、让音乐随心而动 – 音频处理 Web audio API
简介:
Audio对象提供的只是音频文件的播放,而Web Audio则是给了开发者对音频数据进行分析、处理的能力,比如混音、过滤。
系统要求:
ios6+、android chrome、android firefox
实例:

http://sy.qq.com/brucewan/device-api/web-audio.html
核心代码:
var context = new webkitAudioContext();
var source = context.createBufferSource();   // 创建一个声音源
source.buffer = buffer;   // 告诉该源播放何物
createBufferSourcesource.connect(context.destination);   // 将该源与硬件相连
source.start(0); //播放
技术分析:
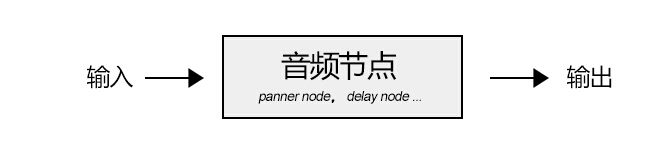
当我们加载完音频数据后,我们将创建一个全局的AudioContext对象来对音频进行处理,AudioContext可以创建各种不同功能类型的音频节点AudioNode,比如
1、源节点(source node)
我们可以使用两种方式加载音频数据:
<1>、audio标签
var sound, audio = new Audio();
audio.addEventListener('canplay', function() {
 sound = context.createMediaElementSource(audio);
 sound.connect(context.destination);
});
audio.src = '/audio.mp3';
<2>、XMLHttpRequest
var sound, context = createAudioContext();
var audioURl = '/audio.mp3'; // 音频文件URL
var xhr = new XMLHttpRequest();
xhr.open('GET', audioURL, true);
xhr.responseType = 'arraybuffer';
xhr.onload = function() {
 context.decodeAudioData(request.response, function (buffer) {
 source = context.createBufferSource();
 source.buffer = buffer;
 source.connect(context.destination);
 }
}
xhr.send();
2、分析节点(analyser node)
我们可以使用AnalyserNode来对音谱进行分析,例如:
var audioCtx = new (window.AudioContext || window.webkitAudioContext)();
var analyser = audioCtx.createAnalyser();
analyser.fftSize = 2048;
var bufferLength = analyser.frequencyBinCount;
var dataArray = new Uint8Array(bufferLength);
analyser.getByteTimeDomainData(dataArray);

function draw() {
 drawVisual = requestAnimationFrame(draw);
 analyser.getByteTimeDomainData(dataArray);
 // 将dataArray数据以canvas方式渲染出来
};

draw();
3、处理节点(gain node、panner node、wave shaper node、delay node、convolver node等)
不同的处理节点有不同的作用,比如使用BiquadFilterNode调整音色(大量滤波器)、使用ChannelSplitterNode分割左右声道、使用GainNode调整增益值实现音乐淡入淡出等等。
需要了解更多的音频节点可能参考:
https://developer.mozilla.org/en-US/docs/Web/API/Web_Audio_API
4、目的节点(destination node)
所有被渲染音频流到达的最终地点
思维发散:
1、可以让CSS3动画跟随背景音乐舞动,可以为我们的网页增色不少;
2、可以尝试制作H5酷酷的变声应用,增加与用户的互动;
3、甚至可以尝试H5音乐创作。
看看google的创意:http://v.youku.com/v_show/id_XNTk0MjQyNDMy.html
二、捕捉用户摄像头 – 媒体流 Media Capture
简介:
通过getUserMedia捕捉用户摄像头获取视频流和通过麦克风获取用户声音。
系统要求:
android chrome、android firefox
实例:
捕获用户摄像头 捕获用户麦克风

http://sy.qq.com/brucewan/device-api/camera.html

http://sy.qq.com/brucewan/device-api/microphone-usermedia.html
核心代码:
1、摄像头捕捉
navigator.webkitGetUserMedia ({video: true}, function(stream) {
 video.src = window.URL.createObjectURL(stream);
 localMediaStream = stream;
}, function(e){

})
2、从视频流中拍照
btnCapture.addEventListener('touchend', function(){
	if (localMediaStream) {
		canvas.setAttribute('width', video.videoWidth);
		canvas.setAttribute('height', video.videoHeight);
		ctx.drawImage(video, 0, 0);
	}
}, false);
3、用户声音录制
navigator.getUserMedia({audio:true}, function(e) {
	context = new audioContext();
	audioInput = context.createMediaStreamSource(e);
	volume = context.createGain();
	recorder = context.createScriptProcessor(2048, 2, 2);
	recorder.onaudioprocess = function(e){
		recordingLength += 2048;
		recorder.connect (context.destination);
	}
}, function(error){});
4、保存用户录制的声音
var buffer = new ArrayBuffer(44 + interleaved.length * 2);
var view = new DataView(buffer);
fileReader.readAsDataURL(blob); // android chrome audio不支持blob
… audio.src = event.target.result;
思维发散:
1、从视频拍照自定义头像;
2、H5视频聊天;
3、结合canvas完成好玩的照片合成及处理;
4、结合Web Audio制作有意思变声应用。
三、你是逗逼? – 语音识别 Web Speech API简介:
1、将文本转换成语音;
2、将语音识别为文本。
系统要求:
ios7+,android chrome,android firefox
测试实例:

http://sy.qq.com/brucewan/device-api/microphone-webspeech.html
核心代码:
1、文本转换成语音,使用SpeechSynthesisUtterance对象;
var msg = new SpeechSynthesisUtterance();
var voices = window.speechSynthesis.getVoices();
msg.volume = 1; // 0 to 1
msg.text = ‘识别的文本内容’;
msg.lang = 'en-US';
speechSynthesis.speak(msg);
2、语音转换为文本,使用SpeechRecognition对象。
var newRecognition = new webkitSpeechRecognition();
newRecognition.onresult = function(event){
	var interim_transcript = '';
	for (var i = event.resultIndex; i < event.results.length; ++i) {
		final_transcript += event.results[i][0].transcript;
	}
};
测试结论:
1、Android支持不稳定;语音识别测试失败(暂且认为是某些内置接口被墙所致)。
思维发散:
1、当语音识别成为可能,那声音控制将可以展示其强大的功能。在某些场景,比如开车、网络电视,声音控制将大大改善用户体验;
2、H5游戏中最终分数播报,股票信息实时声音提示,Web Speech都可以大放异彩。
四、让我尽情呵护你 – 设备电量 Battery API简介:
查询用户设备电量及是否正在充电。
系统要求:
android firefox
测试实例:

http://sy.qq.com/brucewan/device-api/battery.html
核心代码:
var battery = navigator.battery || navigator.webkitBattery || navigator.mozBattery || navigator.msBattery;
var str = '';
if (battery) {
 str += '<p>你的浏览器支持HTML5 Battery API</p>';
 if(battery.charging) {
 str += '<p>你的设备正在充电</p>';
} else {
 str += '<p>你的设备未处于充电状态</p>';
}
 str += '<p>你的设备剩余'+ parseInt(battery.level*100)+'%的电量</p>';
} else {
 str += '<p>你的浏览器不支持HTML5 Battery API</p>';
}
测试结论:
1、QQ浏览器与UC浏览器支持该接口,但未正确显示设备电池信息;
2、caniuse显示android chrome42支持该接口,实测不支持。
思维发散:
相对而言,我觉得这个接口有些鸡肋。
很显然,并不合适用HTML5做电池管理方面的工作,它所提供的权限也很有限。
我们只能尝试做一些优化用户体验的工作,当用户设备电量不足时,进入省电模式,比如停用滤镜、摄像头开启、webGL、减少网络请求等。
五、获取用户位置 – 地理位置 Geolocation简介:
Geolocation API用于将用户当前地理位置信息共享给信任的站点,目前主流移动设备都能够支持。
系统要求:
ios6+、android2.3+
测试实例:

http://sy.qq.com/brucewan/device-api/geolocation.html
核心代码:
var domInfo = $("#info");

// 获取位置坐标
if (navigator.geolocation) {
	navigator.geolocation.getCurrentPosition(showPosition,showError);
}
else{
	domInfo.innerHTML="抱歉,你的浏览器不支持地理定位!";
}

// 使用腾讯地图显示位置
function showPosition(position) {
	var lat=position.coords.latitude;
	var lon=position.coords.longitude;

	mapholder = $('#mapholder')
	mapholder.style.height='250px';
	mapholder.style.width = document.documentElement.clientWidth + 'px';

	var center = new soso.maps.LatLng(lat, lon);
	var map = new soso.maps.Map(mapholder,{
		center: center,
		zoomLevel: 13
	});

	var geolocation = new soso.maps.Geolocation();
	var marker = null;
	geolocation.position({}, function(results, status) {
		console.log(results);
		var city = $("#info");
		if (status == soso.maps.GeolocationStatus.OK) {
			map.setCenter(results.latLng);
			domInfo.innerHTML = '你当前所在城市: ' + results.name;
		if (marker != null) {
			marker.setMap(null);
		}
		// 设置标记
		marker = new soso.maps.Marker({
			map: map,
			position:results.latLng
		});
		} else {
			alert("检索没有结果,原因: " + status);
		}
	});
}
测试结论:
1、Geolocation API的位置信息来源包括GPS、IP地址、RFID、WIFI和蓝牙的MAC地址、以及GSM/CDMS的ID等等。规范中没有规定使用这些设备的先后顺序。
2、初测3g环境下比wifi环境理定位更准确;
3、测试三星 GT-S6358(android2.3) geolocation存在,但显示位置信息不可用POSITION_UNAVAILABLE。
六、把用户捧在手心 – 环境光 Ambient Light简介:
Ambient Light API定义了一些事件,这些时间可以提供源于周围光亮程度的信息,这通常是由设备的光感应器来测量的。设备的光感应器会提取出辉度信息。
系统要求:
android firefox
测试实例:

http://sy.qq.com/brucewan/device-api/ambient-light.html
核心代码:
这段代码实现感应用前当前环境光强度,调整网页背景和文字颜色。
var domInfo = $('#info');
if (!('ondevicelight' in window)) {
	domInfo.innerHTML = '你的设备不支持环境光Ambient Light API';
} else {
	var lightValue = document.getElementById('dl-value');
	window.addEventListener('devicelight', function(event) {
		domInfo.innerHTML = '当前环境光线强度为:' + Math.round(event.value) + 'lux';
		var backgroundColor = 'rgba(0,0,0,'+(1-event.value/100) +')';
		document.body.style.backgroundColor = backgroundColor;
		if(event.value < 50) {
			document.body.style.color = '#fff'
		} else {
			document.body.style.color = '#000'
		}
	});
}
思维发散:
该接口适合的范围很窄,却能做出很贴心的用户体验。
1、当我们根据Ambient Light强度、陀螺仪信息、当地时间判断出用户正躺在床上准备入睡前在体验我们的产品,我们自然可以调整我们背景与文字颜色让用户感觉到舒适,我们还可以来一段安静的音乐,甚至使用Web Speech API播报当前时间,并说一声“晚安”,何其温馨;
2、该接口也可以应用于H5游戏场景,比如日落时分,我们可以在游戏中使用安静祥和的游戏场景;
3、当用户在工作时间将手机放在暗处,偷偷地瞄一眼股市行情的时候,我们可以用语音大声播报,“亲爱的,不用担心,你的股票中国中车马上就要跌停了”,多美的画面。
参考文献:
https://developer.mozilla.org/en-US/docs/Web/API
http://webaudiodemos.appspot.com/
http://www.w3.org/2009/dap/